AtlasMaker 0.7 – Make Texture Atlases in Photoshop
August 2016 Update: AtlasMaker is now on Github: https://github.com/richardjdare/Atlasmaker
In game development it is common to have hundreds if not thousands of texture maps and animation frames in a single project. Keeping track of all these images is taxing for both the developer and the computer, so what we do is arrange the images into texture atlases.
A texture atlas is an image that contains many other images. Usually, all the animation frames for a single sprite, or all the textures for a single object are arranged into a single image. The game code then looks at a smaller portion of this image when it needs to draw a particular sprite or texture.
AtlasMaker is a Photoshop script that lets you create these atlases inside Photoshop. It takes a directory of individual textures and arranges them on a single image. It can be used both for atlases of different sized images, and for tile grids which are commonly used in 2d games. Earlier versions of this script were released in 2009. I know I promised an update long ago, but I have been working on my iPhone game, Toxin. I have been using this script throughout Toxin’s development, but never got round to tidying it up for public release.

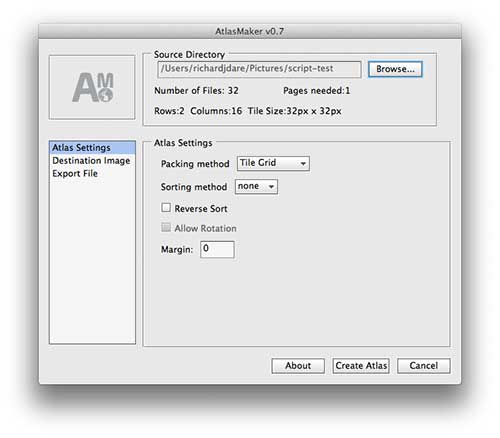
AtlasMaker main window. A tile grid for a 2d game is being created
Features
- Cross platform – tested in Photoshop CS3,CS4,CS5 on Windows and Mac OSX.
- Open Source
- Create texture atlases or tile grids for 2d games.
- Several image sorting algorithms. Find the most efficient one for your textures.
- Add a margin to each image.
- Custom data file export.
- Extendable – It’s easy to add your own rectangle packing algorithms and sorting methods.

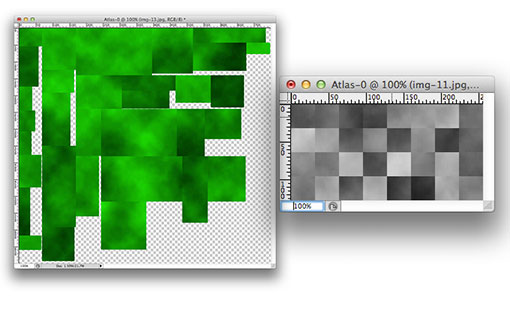
Generated with AtlasMaker: Left, a texture atlas with variable sized images. Right, a tile grid. Images used are randomly generated test textures.
Installing AtlasMaker
There are two ways to running AtlasMaker in Photoshop.
Unzip atlasmaker-v0.7.zip to your photoshop scripts folder. On windows this is usually: C:\Program Files\Adobe\yourphotoshopversion \Presets\Scripts
On a Mac this folder is at: Applications/yourphotoshopversion/Presets/Scripts
When you next start Photoshop, AtlasMaker should appear in the File->Scripts menu.
Alternatively, you can run the script without installing by unzipping the atlasmaker folder somewhere, then selecting Scripts->Browse from the file menu and then selecting AtlasMaker.jsx.
Quickstart guide
The first thing to do is select a directory of images by clicking “browse” at the top of the window. Once you have done this, AtlasMaker will scan through the images and collect size information about them.
Next, you want to select your packing method. If your images are texture maps of different sizes then you want to select the “Atlas Maker”. If you are making a traditional 2d game where the sprites are all the same size, then you want to select the “Tile Grid”
You’ll notice that some text will appear underneath “Number of Files”. This is a notification from the Tile Grid Packer telling you how many rows and columns your images will take up given the default document size. Different packing methods provide different notification messages according to their nature.
Then you can optionally select a sorting method. Sorting the images in different ways can improve the efficiency of the texture atlas. Some packing methods do not allow sorting, and will disable this option if they are selected.
You can also add a margin here if you want a gap between your textures. Margins are added on to the width and height of each image just like CSS margins.
Next, click “Document Settings” and you will be able to set the size of the texture atlas you are going to create. You can also set the document name here, and choose if you want to flatten all the layers into one, once the atlas is complete.
Now click “Create Atlas” and you’re done.
Custom data file export
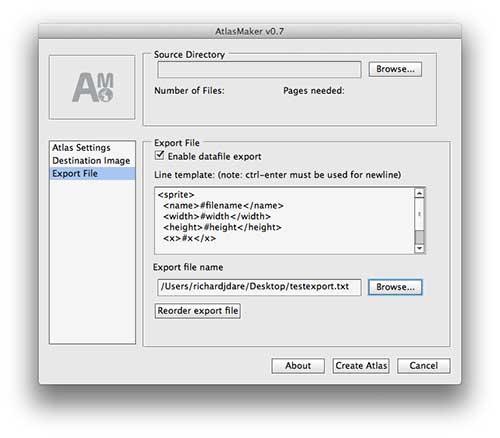
One of AtlasMaker’s most powerful features is the custom data file export. You can export a text file for each texture atlas containing information about each image on the atlas. This might be XML or JSON to be loaded by a game engine, or you could use it to directly generate source code to be pasted into your application.

AtlasMaker custom data file panel. Here an XML fragment will be generated for each texture in the atlas. filenames and texture positions are substituted into the text using tags
Tags are used to substitute information about each image into the text:
- #i – Image index (0.. number of images in directory)
- #filename – Filename of source image
- #width – image width
- #height – image height
- #x – X position of top left corner on atlas
- #y – Y position of top left corner on atlas
- #p – page number
If you click the “Reorder export file” button, you can rearrange the order in which textures are listed in the export file. Just select filenames from the list and click “up” or “down” to reorder them. You can select multiple filenames by shift-clicking.
The zip file contains a readme.txt which describes every option in detail.
AtlasMaker is designed to be extensible. It is easy to add new packing methods and sorting algorithms. I have written the code to be more or less self explanatory in this regard, but if you want me to write something about it, please let me know. And let me know if you find any bugs!

63 Comments